LHC Tunnel

LHC Tunnel

Thursday 6 November 2014

Our cloud in Icehouse

This is going to be a very simple blog to write.

When we upgraded the CERN private cloud to Havana, we wrote a blog post giving some of the details of the approach taken and the problems we encountered.

The high level approach we took rthis time was the same, component by component. The first ones were upgraded during August and Nova/Horizon last of all in October.

The difference this time is that no significant problems were encountered during the production upgrade.

The most time consuming upgrade was Nova. As last time, we took a very conservative approach and disabled the API access to the cloud during the upgrade. With offline backups and the database migration steps taking several hours given the 1000s of VMs and hypervisors, the API unavailability was around six hours in total. All VMs continued to run during this period without issues.

Additional Functions

With the basic functional upgrade, we are delivering the following additional functions to the CERN end users. These are all based off the OpenStack Icehouse release functions and we'll try to provide more details on these areas in future blogs.
  • Kerberos and X.509 authentication
  • Single Sign On login using CERN's Active Directory/ADFS service and the SAML federation functions from Icehouse
  • Unified openstack client for consistent command lines across the components
  • Windows console access with RDP
  • IPv6 support for VMs
  • Horizon new look and feel based on RDO styling
  • Delegated rights to the operators and system administrators to perform certain limited activites on VMs such as reboot and console viewing so they can provide out of working hours support.

Credits

Along with the CERN team, many thanks should go to the OpenStack community for delivering a smooth upgrade across Ceilometer, Cinder, Glance, Keystone, Nova and Horizon.

Tuesday 21 October 2014

Kerberos and Single Sign On with OpenStack

External Authentication with Keystone

One of the most commonly requested features by the CERN cloud user community is support for authentication using Kerberos on the command line and single-sign on with the OpenStack dashboard.

In our Windows and Linux environment, we run Active Directory to provide authentication services. During the Essex cycle of OpenStack, we added support for getting authentication based on Active Directory passwords. However, this had several drawbacks:
  • When using the command line clients, the users had the choice of storing their password in environment variables such as with the local openrc script or re-typing their password with each OpenStack command. Passwords in environment variables has significant security risks since they are passed to any sub-command and can be read by the system administrator of the server you are on.
  • When logging in with the web interface, the users were entering their password into the dashboard. Most of CERN's applications use a single sign on package with Active Directory Federation Services (ADFS). Recent problems such as Heartbleed show the risks of entering passwords into web applications.
The following describes how we configured this functionality.

Approach

With our upgrade to Icehouse completed last week, the new release of the v3 identity API, Keystone now supports several authentication mechanisms through plugins. By default password, token and external authentication were provided. In this scenario, other authentication methods such Kerberos or X.509 can be used with a proper apache configuration and the external plugin provided in keystone. Unfortunately, when enabling these methods on apache, there is no way to make them optional so the client can choose the most appropriate.

Also when checking the projects he can access, the client normally does two operations on keystone, one to retrieve the token, and the other one with the token to retrieve the project list. Even if it is specified in the environment variables, the second call always uses the catalog, so if in the catalog has version 2 and we are using version 3 then we have an exception while doing the API call.

Requirements

In this case we need a solution that allows us to use Kerberos, X.509 or another authentication mechanism in a transparent way and also backwards compatible, so we can offer both APIs and let the user choose which is the most appropriate for its workflow. This will allow us to migrate services from one API version to the next one with no downtime.

In order to allow external authentication to our clients, we need to cover two parts, client side and server side. Client side to distinguish which is the auth plugin to use, and Server side to allow multiple auth methods and API versions at once.

Server Solution

In order to have different entry points under the same api, we would need a load balancer, in this particular case we use HAproxy. From this load balancer we are calling two different sets of backend machines, one for version 2 of the API and the other for version 3. In this loadbalancer, we can analyze the version of the url where the client is connecting to so we can redirect him to the appropriate set. Each backend is running keystone under apachea and it is connected to the same database. We need this to allow tokens to be validated no matter the version is used on the client. The only difference between the backend sets is the catalog, the identity service is different on both pointing the client to the available version on each set. For this particular purpose we will use a templatedcatalog.


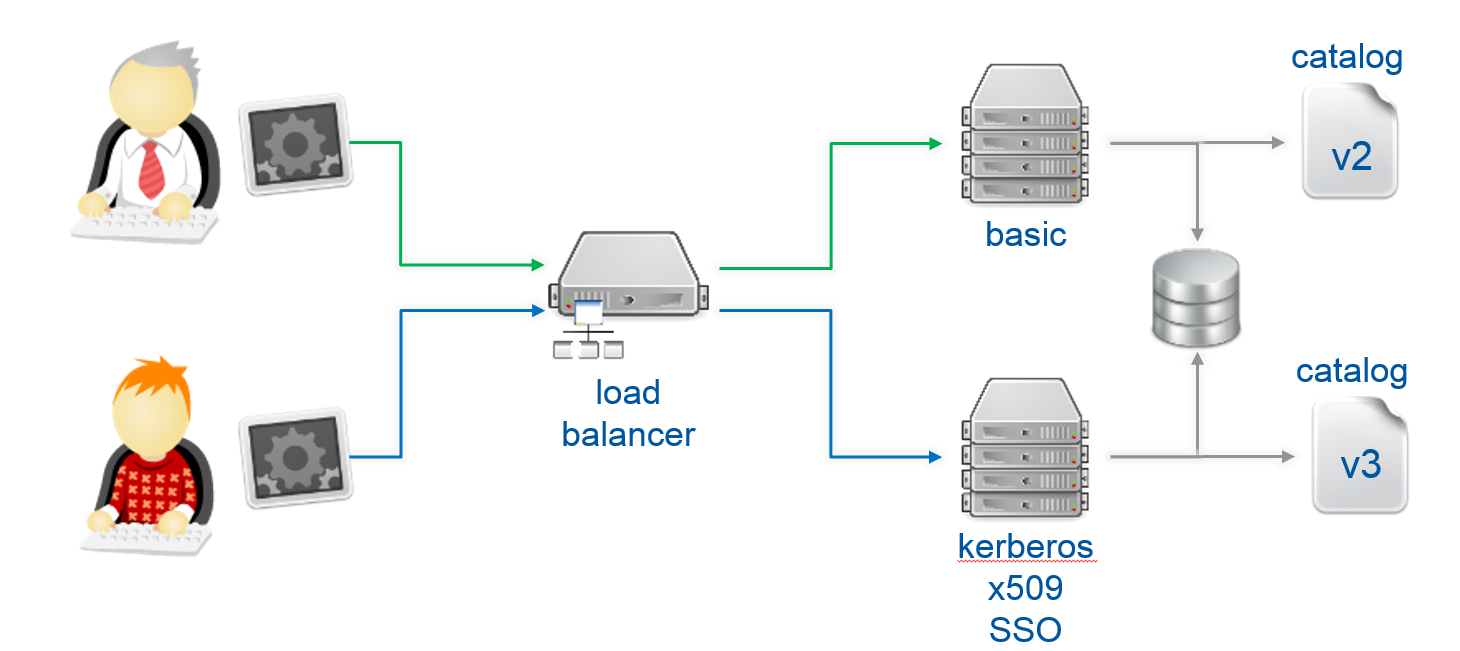
Right now we solve the multiversion issue of the OpenStack environment, but we didn't allow Kerberos or X.509. As these methods are not optional we may need different entry points for each authentication plugin used. So we need entry points for OpenStack authentication (password, token), Kerberos and X.509. There is no issue with the catalog if we enable these methods, all of them can be registered on the service catalog like normal OpenStack authentication, because any consequent call on the system will use token based authentication.
So in the apache v3 backend we have the following urls defined:

https://mykeystone/main/v3
https://mykeystone/admin/v3
https://mykeystone/krb/v3
https://mykeystone/x509/v3

If you post an authentication request to the Kerberos url, this will require a valid Kerberos token, in case it is not sent it will initiate a challenge. After validating it, it will it the user as the REMOTE_USER. In case of client certificate authentication, you will use the X.509 url that will require a valid certificate, in this case it will use the DN as the REMOTE_USER. After this variable is set, then Keystone can take over and check the user in the Keystone database.
There is a small caveat, we cannot do offloading of SSL client authentication on the HAproxy, so for this purpose we need to connect directly from the client, it uses a different port 8443 and connects directly to the backends configured. So for X.509 authentication we use 'https://mykeystone:8443/x509/v3'

Client Solution

For the client side, the plugin mechanism will only be available on the common cli (python-openstackclient) and not on the rest of the toolset (nova, glance, cinder, ...). There is no code yet that implements the plugin functionality, so in order to provide a short term implementation, and based on our current architecture, we can base it the selection of the plugin on the OS_AUTH_URL for the moment. The final upstream implementation will almost certainly differ at this point by using a parameter or discover the auth plugins available. In that case the client implementation may change but this is likely to be close to the initial implementation.

In openstackclient/common/clientmanager.py
...
        if 'krb' in auth_url and ver_prefix == 'v3':
            LOG.debug('Using kerberos auth %s', ver_prefix)
            self.auth = v3_auth_kerberos.Kerberos(
                auth_url=auth_url,
                trust_id=trust_id,
                domain_id=domain_id,
                domain_name=domain_name,
                project_id=project_id,
                project_name=project_name,
                project_domain_id=project_domain_id,
                project_domain_name=project_domain_name,
            )
        elif 'x509' in auth_url and ver_prefix == 'v3':
            LOG.debug('Using x509 auth %s', ver_prefix)
            self.auth = v3_auth_x509.X509(
                auth_url=auth_url,
                trust_id=trust_id,
                domain_id=domain_id,
                domain_name=domain_name,
                project_id=project_id,
                project_name=project_name,
               project_domain_id=project_domain_id,
                project_domain_name=project_domain_name,
                client_cert=client_cert,
            )
        elif self._url:
...

HAproxy configuration

global
  chroot  /var/lib/haproxy
  daemon
  group  haproxy
  log  mysyslogserver local0
  maxconn  8000
  pidfile  /var/run/haproxy.pid
  ssl-default-bind-ciphers  ECDHE-RSA-AES128-GCM-SHA256:ECDHE-ECDSA-AES128-GCM-SHA256:ECDHE-RSA-AES256-GCM-SHA384:ECDHE-ECDSA-AES256-GCM-SHA384:DHE-RSA-AES128-GCM-SHA256:DHE-DSS-AES128-GCM-SHA256:kEDH+AESGCM:ECDHE-RSA-AES128-SHA256:ECDHE-ECDSA-AES128-SHA256:ECDHE-RSA-AES128-SHA:ECDHE-ECDSA-AES128-SHA:ECDHE-RSA-AES256-SHA384:ECDHE-ECDSA-AES256-SHA384:ECDHE-RSA-AES256-SHA:ECDHE-ECDSA-AES256-SHA:DHE-RSA-AES128-SHA256:DHE-RSA-AES128-SHA:DHE-DSS-AES128-SHA256:DHE-RSA-AES256-SHA256:DHE-DSS-AES256-SHA:DHE-RSA-AES256-SHA:AES128-GCM-SHA256:AES256-GCM-SHA384:AES128:AES256:AES:!aNULL:!eNULL:!EXPORT:!DES:!RC4:!MD5:!PSK
  stats  socket /var/lib/haproxy/stats
  tune.ssl.default-dh-param  2048
  user  haproxy

defaults
  log  global
  maxconn  8000
  mode  http
  option  redispatch
  option  http-server-close
  option  contstats
  retries  3
  stats  enable
  timeout  http-request 10s
  timeout  queue 1m
  timeout  connect 10s
  timeout  client 1m
  timeout  server 1m
  timeout  check 10s

frontend cloud_identity_api_production
  bind 188.184.148.158:443 ssl no-sslv3 crt /etc/haproxy/cert.pem verify none
  acl  v2_acl_admin url_beg /admin/v2
  acl  v2_acl_main url_beg /main/v2
  default_backend  cloud_identity_api_v3_production
  timeout  http-request 5m
  timeout  client 5m
  use_backend  cloud_identity_api_v2_production if v2_acl_admin
  use_backend  cloud_identity_api_v2_production if v2_acl_main

frontend cloud_identity_api_x509_production
  bind 188.184.148.158:8443 ssl no-sslv3 crt /etc/haproxy/cert.pem ca-file /etc/haproxy/ca.pem verify required
  default_backend  cloud_identity_api_v3_production
  rspadd  Strict-Transport-Security:\ max-age=15768000
  timeout  http-request 5m
  timeout  client 5m
  use_backend  cloud_identity_api_v3_production if { ssl_fc_has_crt }

backend cloud_identity_api_v2_production
  balance  roundrobin
  stick  on src
  stick-table  type ip size 20k peers cloud_identity_frontend_production
  timeout  server 5m
  timeout  queue 5m
  timeout  connect 5m
  server cci-keystone-bck01 128.142.132.22:443 check ssl verify none
  server cci-keystone-bck02 188.184.149.124:443 check ssl verify none
  server p01001453s11625 128.142.174.37:443 check ssl verify none

backend cloud_identity_api_v3_production
  balance  roundrobin
  http-request  set-header X-SSL-Client-CN %{+Q}[ssl_c_s_dn(cn)]
  stick  on src
  stick-table  type ip size 20k peers cloud_identity_frontend_production
  timeout  server 5m
  timeout  queue 5m
  timeout  connect 5m
  server cci-keystone-bck03 128.142.159.38:443 check ssl verify none
  server cci-keystone-bck04 128.142.164.244:443 check ssl verify none
  server cci-keystone-bck05 128.142.132.192:443 check ssl verify none
  server cci-keystone-bck06 128.142.146.182:443 check ssl verify none

listen stats
  bind 188.184.148.158:8080
  stats  uri /
  stats  auth haproxy:NOTAPASSWORD

peers cloud_identity_frontend_production
  peer cci-keystone-load01.cern.ch 188.184.148.158:7777
  peer cci-keystone-load02.cern.ch 128.142.153.203:7777
  peer p01001464675431.cern.ch 128.142.190.8:7777
Apache configuration
WSGISocketPrefix /var/run/wsgi

Listen 443

<VirtualHost *:443>
  ServerName keystone.cern.ch
  DocumentRoot /var/www/cgi-bin/keystone
  LimitRequestFieldSize 65535

  SSLEngine On
  SSLCertificateFile      /etc/keystone/ssl/certs/hostcert.pem
  SSLCertificateKeyFile   /etc/keystone/ssl/keys/hostkey.pem
  SSLCertificateChainFile /etc/keystone/ssl/certs/ca.pem
  SSLCACertificateFile    /etc/keystone/ssl/certs/ca.pem
  SSLVerifyClient         none
  SSLOptions              +StdEnvVars
  SSLVerifyDepth          10
  SSLUserName             SSL_CLIENT_S_DN_CN
  SSLProtocol             all -SSLv2 -SSLv3

  SSLCipherSuite          ECDHE-RSA-AES128-GCM-SHA256:ECDHE-ECDSA-AES128-GCM-SHA256:ECDHE-RSA-AES256-GCM-SHA384:ECDHE-ECDSA-AES256-GCM-SHA384:DHE-RSA-AES128-GCM-SHA256:DHE-DSS-AES128-GCM-SHA256:kEDH+AESGCM:ECDHE-RSA-AES128-SHA256:ECDHE-ECDSA-AES128-SHA256:ECDHE-RSA-AES128-SHA:ECDHE-ECDSA-AES128-SHA:ECDHE-RSA-AES256-SHA384:ECDHE-ECDSA-AES256-SHA384:ECDHE-RSA-AES256-SHA:ECDHE-ECDSA-AES256-SHA:DHE-RSA-AES128-SHA256:DHE-RSA-AES128-SHA:DHE-DSS-AES128-SHA256:DHE-RSA-AES256-SHA256:DHE-DSS-AES256-SHA:DHE-RSA-AES256-SHA:AES128-GCM-SHA256:AES256-GCM-SHA384:AES128:AES256:AES:!aNULL:!eNULL:!EXPORT:!DES:!RC4:!MD5:!PSK
  SSLHonorCipherOrder     on
  Header add Strict-Transport-Security "max-age=15768000"


  WSGIDaemonProcess keystone user=keystone group=keystone processes=2 threads=2
  WSGIProcessGroup keystone

  WSGIScriptAlias /admin /var/www/cgi-bin/keystone/admin
  <Location "/admin">
    SSLRequireSSL
    SSLVerifyClient       none
  </Location>

  WSGIScriptAlias /main /var/www/cgi-bin/keystone/main
  <Location "/main">
    SSLRequireSSL
    SSLVerifyClient       none
  </Location>

  WSGIScriptAlias /krb /var/www/cgi-bin/keystone/main

  <Location "/krb">
    SSLRequireSSL
    SSLVerifyClient       none
  </Location>

  <Location "/krb/v3/auth/tokens">
    SSLRequireSSL
    SSLVerifyClient       none
    AuthType              Kerberos
    AuthName              "Kerberos Login"
    KrbMethodNegotiate    On
    KrbMethodK5Passwd     Off
    KrbServiceName        Any
    KrbAuthRealms         CERN.CH
    Krb5KeyTab            /etc/httpd/http.keytab
    KrbVerifyKDC          Off
    KrbLocalUserMapping   On
    KrbAuthoritative      On
    Require valid-user
  </Location>

  WSGIScriptAlias /x509 /var/www/cgi-bin/keystone/main

  <Location "/x509">
    Order allow,deny
    Allow from all
  </Location>

  WSGIScriptAliasMatch ^(/main/v3/OS-FEDERATION/identity_providers/.*?/protocols/.*?/auth)$ /var/www/cgi-bin/keystone/main/$1

  <LocationMatch /main/v3/OS-FEDERATION/identity_providers/.*?/protocols/saml2/auth>
    ShibRequestSetting requireSession 1
    AuthType shibboleth
    ShibRequireSession On
    ShibRequireAll On
    ShibExportAssertion Off
    Require valid-user
  </LocationMatch>

  <LocationMatch /main/v3/OS-FEDERATION/websso>
    ShibRequestSetting requireSession 1
    AuthType shibboleth
    ShibRequireSession On
    ShibRequireAll On
    ShibExportAssertion Off
    Require valid-user
  </LocationMatch>

  <Location /Shibboleth.sso>
    SetHandler shib
  </Location>

  <Directory /var/www/cgi-bin/keystone>
    Options FollowSymLinks
    AllowOverride All
    Order allow,deny
    Allow from all
  </Directory>
</VirtualHost>

References

The code of python-openstackclient as long as the python-keystoneclient that we are using for this implementation is available at:


We will be working with the community in the Paris summit to find the best way to integrate this functionality into the standard OpenStack release.

Credits

The main author is Jose Castro Leon with help from Marek Denis.

Many thanks to the Keystone core team for their help and advice on the implementation.

Saturday 19 July 2014

OpenStack plays Tetris : Stacking and Spreading a full private cloud

At CERN, we're running a large scale private cloud which is providing compute resources for physicists analysing the data from the Large Hadron Collider. With 100s of VMs created per day, the OpenStack scheduler has to perform a Tetris like job to assign the different flavors of VMs falling to the specific hypervisors.

As we increase the number of VMs that we're running on the CERN cloud, we see the impact of a number of configuration choices made early on in the cloud deployment. One key choice is how to schedule VMs across a pool of hypervisors.

We provide our users with a mixture of flavors for their VMs (for details, see http://openstack-in-production.blogspot.fr/2013/08/flavors-english-perspective.html).

During the past year in production, we have seen a steady growth in the number of instances to nearly 7,000.


At the same time, we're seeing an increasing elastic load as the user community explores potential ways of using clouds for physics.


Given that CERN has a fixed resource pool and the budget available is defined and fixed, the underlying capacity is not elastic and we are now starting to encounter scenarios where the private cloud can become full. Users see this as errors when they request VMs that no free hypervisor could be located.

This situation occurs more frequently for the large VMs. Physics programs can make use of multiple cores to process physics events in parallel and our batch system (which runs on VMs) benefits from a smaller number of hosts. This accounts for a significant number of large core VMs.


The problem occurs as the cloud approaches being full. Using the default OpenStack configuration (known as 'spread'), VMs are evenly distributed across the hypervisors. If the cloud is running at low utilisation, this is an attractive configuration as CPU and I/O load are also spread and little hardware is left idle.

However, as the utilisation of the cloud increases, the resources free on each hypervisor are reduced evenly. To take a simple case, a cloud with two compute nodes of 24 cores handling a variety of flavors. If there are requests for two 1-core VMs followed by one 24 core flavor, the alternative approaches can be simulated.

In a spread configuration,
  • The first VM request lands on hypervisor A leaving A with 23 cores available and B with 24 cores
  • The second VM request arrives and following the policy to spread the usage, this is scheduled to hypervisor B, leaving A and B with 23 cores available.
  • The request for one 24 core flavor arrives and no hypervisor can satisfy it despite there being 46 cores available and only 4% of the cloud used.
In the stacked configuration,

  • The first VM request lands on hypervisor A leaving A with 23 cores available and B with 24 cores
  • The second VM request arrives and following the policy to stack the usage, this is scheduled to hypervisor A, leaving A with 22 cores and B with 24 cores available.
  • The request for one 24 core flavor arrives and is satisfied by B
A stacked configuration is configured using the RAM weight being negative (i.e. prefer machines with less RAM). This has the effect to pack the VMs. This is done through a nova.conf setting as follows

ram_weight_multiplier=-1.0


When a cloud is initially being set up, the question of maximum packing does not often come up in the early days. However, once the cloud has workload running under spread, it can be disruptive to move to stacked since the existing VMs will not be moved to match the new policy.

Thus, it is important as part of the cloud planning to reflect on the best approach for each different cloud use case and avoid more complex resource rebalancing at a later date.

References

  • OpenStack configuration reference for scheduling at http://docs.openstack.org/trunk/config-reference/content/section_compute-scheduler.html


Thursday 20 March 2014

CERN Cloud Architecture - Update

In the last OpenStack Design Summit in Hong Kong I presented the CERN Cloud Architecture with the talk “Deep Dive into the CERN Cloud Infrastructure” https://www.openstack.org/summit/openstack-summit-hong-kong-2013/session-videos/presentation/deep-dive-into-the-cern-cloud-infrastructure . Since then the infrastructure grown to a third cell and we enabled ceilometer compute-agent. Because of that we needed to perform some architecture changes to cope with the number of nova-api calls that ceilometer compute-agent generates.

The cloud infrastructure has now more than 50000 cores and after the next hardware delivers expected during the next months, more than 35000 new cores will be added most of them in the remote Computer Centre in Hungary. Also, we continue to migrate existing servers to OpenStack compute nodes at an average of 100 servers per week.

Fig. 1 – High-level view of CERN Cloud Infrastructure
We are using Cells in order to scale the infrastructure and for project distribution.
At the moment we have three Compute Cells. Two are deployed in Geneva, Switzerland and the other in Budapest, Hungary.

All OpenStack services running in the Cell Controllers are behind a Load Balancer and we have at least 3 running instances for each of them. As message broker we are using RabbitMQ clustered with HA queues.

Metering is an important requirement for CERN to account resources and ceilometer is the obvious solution to provide this functionality.
Considering our Cell setup we are running ceilometer api and ceilometer collector in the API Cell and the ceilometer agent-central and ceilometer collector in the Compute Cells.


Fig.2 – OpenStack services that are running in different Cell layers at CERN Cloud infrastructure. At green the new configured components.
In order to get information about the running VMs ceilometer compute-agent calls nova-api. In our initial setup we used the simple approach to use nova-api already running in the API Cell. This means all ceilometer compute-agents will authenticate with keystone in the API Cell and then call nova-api running there. Unfortunately this approach doesn’t work using cells because the bug: https://bugs.launchpad.net/nova/+bug/1211022
Even if ceilometer was not getting the right instance domain and failed to find the VMs in the compute nodes we noticed a huge increase in the number of nova-api calls that were hitting the nova-api servers on API Cell that could degrade user experience.

We then decided to move this load to the Compute Cells enabling nova-api compute there and point all ceilometer compute-agents to them instead. This approach has 3 main advantages:
1) Isolation of nova-api calls per Cell allowing a better dimensioning of Compute Cell controllers and separation between user and ceilometer requests.
2) nova-api on the Compute Cells uses nova Cell databases. Distribute the queries between databases not overloading API Cell database.
3) Because point 2) the VM domain name is now reported correctly.

However to deploy nova-api compute at Compute Cell level we also needed to configure other components: keystone, glance-api and glance-registry.

- Keystone is configured per Compute Cell with the following endpoints (local nova-api and local glance-api). Only service accounts can authenticate with the keystones running in the Compute Cells, users are not allowed.
Configuring keystone per Compute Cell allows us to distribute the nova-api load at Cell level. For ceilometer only Cell databases are used to retrieve instance information. Keystone load is also distributed. Instead using the API Cell keystone used by every user, ceilometer only uses the Compute Cell keystones that are completely isolated from the API Cell. This is especially important because we are not using PKI and our keystone configuration is single threaded.

- From the beginning we are running glance-api at Compute Cell level. This allows us to have image cache in the Compute Cells, which is especially important for the Budapest Computer Centre since Ceph deployment is at Geneva.
Ceilometer compute-agent also queries for image information using nova-api. However we can’t use the existing glance-api because it uses the API Cell keystone for token validation. Because of that we setup other glance-api and glance-registry at Compute Cell level but listening a different port and using the local keystone.

- Nova-api compute is enabled at Compute Cell level. All nova services running in the Compute Cell controllers use the same configuration file “nova.conf”. This means that for nova-api service we needed to overwrite the “glance_api_servers” configuration option to point to the new local glance-api, but keeping the old configuration that is necessary to spawn instances. Nova-api service is using the local keystone. Metadata service is not affected because of that.

We expect that with this distribution if ceilometer starts to overload the infrastructure, user experience will not be affected.
With all these changes in the architecture we now enabled ceilometer compute-agent in all Compute Cells.

Just out of curiosity I would like to finish this blog post with the plot showing the number of the nova-api calls before and after enabling ceilometer compute-agent in all infrastructure. In total it increased more than 14 times.


Friday 7 March 2014

Enable Cinder-multi-backend with an existing Ceph backend.


CERN IT is operating a 3 PetaByte Ceph cluster and one of our use-cases is to store our OpenStack volumes and images. For more details on Ceph cluster, Dan van der Ster's presentation is available at the following link.

After the migration to Havana, we started to provide the volume service to a wider audience and therefore needed to tune our cinder configuration.

This post will show you how we enabled the multi-backend in Cinder. We dealt with the migration of our Ceph volume to the new volume type. And finally we will look at the quality of service we want to enable on our newly created volume type.

We had already, Ceph configured as Default:
[DEFAULT]
...
quota_volumes=0
quota_snapshots=0
volume_driver=cinder.volume.drivers.rbd.RBDDriver
rbd_user=volumes
rbd_pool=volumes
rbd_secret_uuid=00000000-1111-2222-3333-000000000001

We added the following option in /etc/cinder/cinder.conf to enable the multi backend support:

[DEFAULT]
...
enabled_backends=standard
scheduler_driver=cinder.scheduler.filter_scheduler.FilterScheduler
default_volume_type=standard
[standard]
volume_group=standard
rbd_user=volumes
rbd_pool=volumes
volume_backend_name=standard
volume_driver=cinder.volume.drivers.rbd.RBDDriver
rbd_secret_uuid=00000000-1111-2222-3333-000000000001

Create the volume type:
# cinder type-create standard
# cinder type-key standard set volume_backend_name=standard

To verify the type has been created you can run:

# cinder extra-specs-list
+--------------------------------------+----------+---------------------------------------+
|                  ID                  |   Name   |              extra_specs              |
+--------------------------------------+----------+---------------------------------------+
| c6ad034a-5d97-443b-97c6-58a8744bf99b | standard | {u'volume_backend_name': u'standard'} |
+--------------------------------------+----------+---------------------------------------+

A restart is needed after these changes:

# for i in volume api schedule; do service restart openstack-cinder-$i ; done

At this point it is not possible to attach/detach the volumes you created without a type.
Nova will fail with the following error:

nova.openstack.common.notifier.rpc_notifier ValueError: Circular reference detected

To fix it, we had to update manually the database, with two steps:
mysqldump cinder (don't forget :)
  • Update the volume_type_id column with the output of cinder extra-specs-list :
update volumes set volume_type_id="c6ad034a-5d97-443b-97c6-58a8744bf99b" where volume_type_id is NULL; 
  • For each controller the host column needs an update:
update volumes set  host='p01@standard' where host='p01';
update volumes set  host='p02@standard' where host='p02'; 

All volume are now of type standard and can be operate as usual. Be sure to have "default_volume_type" defined in your cinder.conf otherwise it will default to 'None' and these volumes will not be functional.

The last step is to delete from your DEFAULT section the old volume settings.

Since we have a large number of disks in the ceph store, there is a very high potential capacity for IOPS but we want to be sure that individual VMs cannot monopolise this capacity. This involves enabling the Quality-of-Service features in cinder.

Enabling QoS is straight forward:
# cinder qos-create standard-iops consumer="front-end" read_iops_sec=400 write_iops_sec=200
# cinder qos-associate 10a7b93c-38d7-4061-bfb8-78d01e2fe6d8 c6ad034a-5d97-443b-97c6-58a8744bf99b
If you want to add additional limits:
# cinder qos-key 10a7b93c-38d7-4061-bfb8-78d01e2fe6d8 set read_bytes_sec=80000000
# cinder qos-key 10a7b93c-38d7-4061-bfb8-78d01e2fe6d8 set write_bytes_sec=40000000
# cinder qos-list
For the QoS parameters to be activated for an existing volume, you need to detach and reattach the old volumes.

This information is collected from the cloud team from CERN and a big thank you to the Ceph team for the help.